5″ crop from a 30″ print… do you see my dirty windows?
Crop from a 30″ print… do you see the screen?
“Normal” Scene.
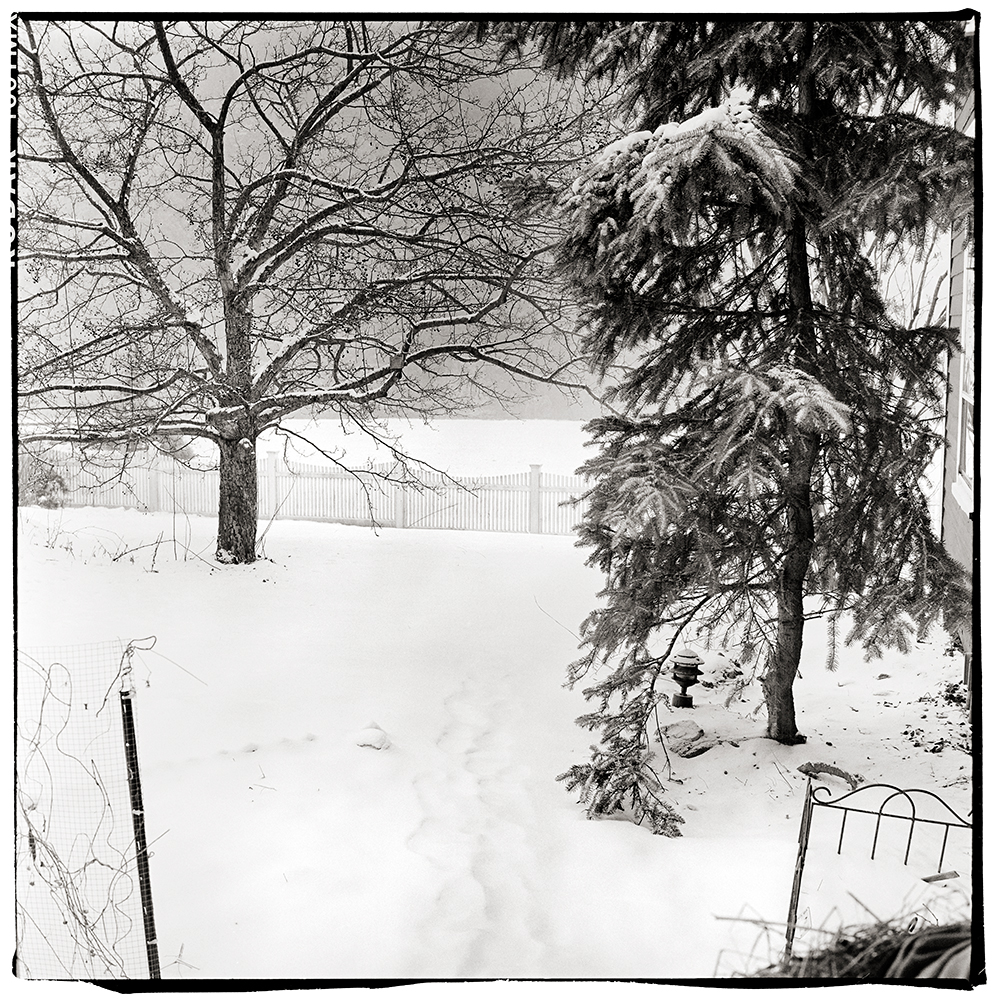
5″ crop from a 30″ print… yes, it is snowing in the image.
5″ detail crop of a 30″ print… look at the texture in the snow… Zone 8!
Few notes:
Both test images were shot on Kodak TMAX 100 at box speed.
The first test scene was very extreme… Zone 3 on the lower cabinets and the outside snow was Zone 14. The detail images are amazing and I really like how the grain is rendered.
In the second test scene I chose something that had a more “normal” range… deep shadows on the far right bush are Zone 3 and the lightest snow fell on a solid Zone 8… it was snowing during the test shots which is normal for Vermont this time of year, you can see the texture the falling snow makes in the background… the range is quite impressive and very easy to work with.
Both scans were straight scans (Imacon) with no sharpening and no noise reduction applied. In Photoshop my standard contrast adjustments were made with little to no effort. In both cases I had more than enough shadow information and a simple “S” curve did the trick… much like I would do with Diafine processed negatives.
When I compare these negative to the Fuji Acros negatives I find the Acros is a bit softer and the highlights tend to get very dense whereas the Kodak Tmax 100 negatives are a bit thinner looking but have full shadow detail and very controlled highlight density. The grain on the Tmax 100 in my opinion is a bit sharper than the Acros but both look really nice.
Both test images were shot on my 1960 Rollei TLR “F” (120). The first test image was at F5.6 at 1/4 sec and the second image was F11 at 1/30th.
How’s that for a great way to start the New Year!
Caffenol C Note:
I am working on a new book which will outline the technique I use for processing with Caffenol C and also give a starting direction for scanning and Photoshop adjustments to these negatives. I hope to finish sometime this winter so stay tuned.
Here is a quick technique I use from time to time to get the maximum usable dynamic range out of film on a contrasty scene.
Film: Kodak TMAX 400 (TMY-2)
Developer: PMK 1:2:100 @70 F (Mixed with Distilled H2O)
Please note: If you have never used PMK developer understand that it requires careful handling… always wear gloves and use safe chemical handling techniques as it can be quite toxic. Also with T Grain films the temperature is important so use a water bath to maintain 70 F during processing.
Exposure:
Expose the scene for the shadows… if you have a spot meter make sure you have a solid Zone III…. don’t worry about the highlights as they will be just fine. (Stay tuned for my review of the new spot meter by Metered Light!)
Once you have your exposure figured out overexpose by 3 stops. You could always just set your meter to an EI of 50 instead of the normal 400 for TMY-2 (this is what I do). In simplest terms we are overexposing by 3 stops and developing for 50% of our normal time. The developing procedure listed below represents a 50% reduction in development time from my normal with this film / developer combination. This technique will work for different films with PMK as long as you follow the simple rule…. overexpose by 3 stops and reduce your development time by 50%.
Processing:
1. Pre-wet- 1 minute at 70F, constant agitation (distilled H2O).
2. Developer: PMK for 7.5 minutes (1+2+100). Continuous agitation for the first 30 seconds then one inversion every 15 seconds till completed time. Save the used developer as you will use it again in the after bath.
3. Stop: Tap water, 2 minutes fill and dump with agitation. Do not use anything but water!
4. Fixer: TF-4 for 5 minutes, follow package directions. Only use TF-4 fixer!
5. After Bath: For those of you not use to using PMK you reuse the saved exhausted developer by dumping it into the tank for a second time after the fixer which will increase the image stain. 2 minutes with standard agitation. There are schools of thought that suggest that the after-bath is not important… with some films like 400TX I would agree but with this technique and film it is a good thing in my opinion.
6. Wash for 30 minutes.
7. Wetting Agent.
8. Dry.
Note: This technique as outlined here is for scanning purposes and I have not tested it for wet darkroom usage so I do not know how well it would work, BUT- for scanning it is fantastic. I would only use this technique for situations where the contrast / dynamic range is well beyond “normal”… this plus a bit of pre-exposure goes a long ways (no pre-exposure was used on this image but I will write an article on this technique very soon)! I have tested it on “normal” scenes with success, but it does require a bit more work in Photoshop to correct for the huge expressive shadows and somewhat flattened highlights, so it is best to use this for high contrast scenes.
So the results….drumroll please…
Inside Indian Hill Imageworks
In the image above the shadows (Zone III) were placed on the dark barn board above the windows… the snow outside which was in direct sunlight was 17 stops brighter… this is a straight scan on our Imacon… no dodging or burning! There were no lights on inside the building so it was quite dark. In Photoshop I added a minor “S” curve but nothing else. The grain is very nice and controlled for 35mm. The snow outside the window has nice detail (not sure how well that reads in the online image)… nothing is lost on either end.
I chose TMY-2 for this test as it is box speed in PMK and it is a film I really like… another good choice would be TMAX 100 which is also box speed but with the 3 stop overexposure you have a working film speed of 12… time to break out the tripod!
Click on the audio logo to listen to this 10 minute discussion on my favorite films both black and white and color and which developer combo I use at Indian Hill Imageworks for the vast majority of my artworks.
A quick audio blog on how our expectations of a perfect print surface has changed from traditional wet darkroom spotted prints to todays digital prints. Click on the audioblog logo to listen…
Note on image: I use my hand to adjust the brush tip on my spotting brush to a perfect point and to make sure that the flow of dye is perfect.
TIP: If you want to try to spot a digital print, one suggestion is to save the left over ink in your catridges and use them for spotting instead of traditional spotting dyes.
Sample images from the Kodak Zi8 using the 5.3MP still camera mode in both macro and distance setting. Click on the audioblog logo to listen to my thoughts on using the new pocket recorder, features I liked, features I wish it had and my conclusion compared to my previous Kodak Zi6 and Vado HD.
I’m about to start an extensive test of the new Kodak Zi8 which is due out next month. From my first tests this is a huge improvement on the Zi6 and perfect for my video recordings here on FR. One feature I love is the mic input with adjustable record level… this is huge as most internal mics are Mono and a bit noisy to say the least… so I got a little carried away.
Here is the rig I made using existing parts- a nice setup as I get a 90 degree and 120 degree stereo recording that when matched to the visual is a nice small package. My more in-depth review will be in a week or two but all videos from here on will be recorded on this setup… with and without the rather (ahem) phallic mic.
Viva la Revolution- Stephen
Ok, so lets put everything together and start processing some film. First, be sure to listen/ watch Part 1 and Part 2 prior to this post as there is important information in those posts not covered here. Then click on the Audio Blog Logo to hear an 11 minute summary of tests- what worked and what didn’t- and my thoughts on successful stand development.
Recipes described in the Audio Portion of this post:
Fuji Acros (EI 100 / 125)
800 ML Distilled Water
3 ML R09
200 ML Xtol Developer
1/4 Teaspoon Borax (optional but helps control fog)
1-2 Teaspoons Asorbic Acid (optional)
Process as described for 3 Hours. You can cut this in half for smaller tanks.
Kodak TMY-2 TMAX 400
800 ML Distilled Water
5 ML R09
200 ML Xtol Developer
1/4 Teaspoon Borax (optional but helps control fog)
1-2 Teaspoons Asorbic Acid (optional)
Process as described for 1 – 1.5 hours. You can cut this in half for smaller tanks.
You can use the recipes above for many films… I’d suggest the TMY-2 Reciepe for 2 hours with films such as TX, Delta 100, Delta 400 and HP5… do a test at 2 hours and then one at 3 hours to see what works best for you!
Source for additional Information and example images (good book to buy!):
This is part one in a multi-part article on stand development and semi-stand development (BW) for the purposes of scanning. I have been spending much time looking at different dilutions, different agitation techniques, different recipies and I have come up with a good working solution for my tested films that produces perfect results every time.
To listen to the audioblog portion of this post … just click on the Audio Logo.
Many of you know I really like Diafine Developer (I have written several articles here on its fantastic qualities for scanning)… the techniques I am about to outline have many of the advantages of Diafine but with finer grain and better highlight separation.
Before we get started, here is a shopping list if you want to try this technique for yourself:
Stay tuned for Part 2 in two days!
Viva la Revolution- Stephen
Ethical Note: I do not endorse any vendor of photographic material over another. The links provided above are just an easy source to find the materials needed but by no means are the best or only source.


 This is part one in a multi-part article on stand development and semi-stand development (BW) for the purposes of scanning. I have been spending much time looking at different dilutions, different agitation techniques, different recipies and I have come up with a good working solution for my tested films that produces perfect results every time.