
hybrid arts
The Flip Flop Decade: The Last Ten Years of Photography

Click on the audio blog logo to listen to this 14 minute review of the last 10 years of photography from my perspective as a hybrid artist and where the industry is possibly going in the next decade.
To everyone I wish a safe and happy New Years and stay tuned for a new post in a few days.

Make One and Be Done
 Click on the audio blog logo to listen to a discussion on making one of one photographic prints.

New Artwork form my upcoming show at Indian Hill Imageworks, Opening October 9 from 5-7 pm.
- Hand-held negative pinhole image printed on hand-made Bhutan Mitsumata Thick White paper as a d’Vinci Noir Print
- Edition size: one.
- Image size: 22″ x 32″
Inside Analog Photo Interview of Stephen Schaub
![]()
Click on the Inside Analog Photo icon to listen to a 37 minute interview of yours truly on a wide range of topics including: film, scanning, printing, and thoughts on the hybrid workflow. Interview is by Scott Sheppard, Executive Producer/ Anchor Inside Analog Photo.
You can also download the podcast at itunes… here is the direct link:
http://itunes.apple.com/WebObjects/MZStore.woa/wa/viewPodcast?id=291806626
Viva la Revolution- Stephen
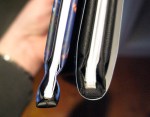
Leica 28mm Elmarit f 2.8 ASPH Meets Kodak Ektar

Just a quick post… I’ve been looking for an “affordable” Leica 28mm lens and was able to make the move last week as Leica has a $300 dollar rebate now available! I decided on the 28mm Elmarit F 2.8 ASPH for a few reasons:
1. It is really small and light and only blocks a very little bit of the lower right corner of the viewfinder on my M7 when the hood is attached- none when it is not.
2. According to test reports* it’s damn sharp (I agree)… see print below / link. Additionally it has very little distortion and a very nice OOF (out of focus) rendering.
3. I had owned the Voigtlander 28mm F 1.9 Ultron lens a few years back and was not really that impressed (so I sold it) and the Leica 28mm F2 ASPH Summicron was out of the question due to the cost and it is a larger lens which blocks more of the viewfinder.
So how good is this lens….

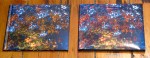
Print 1: Full size print 9.5″ x 25″. Printed on Hand-coated Fabriano Artistico 640 gsm.

Print 2: Crop 4.5″ x 4.5″ of Full Size 9.5″ x 25″ Print

Print 3: Crop 4.5″ x 4.5″ of Extreme Full Size 19″ x 50″ Print!
Note: The negative was scanned on an Imacon Scanner (wet mount) at 4725 optical dpi, 16 Bit… about a 500MB file. Film… Kodak Ektar 100.
Viva la Revolution-
Stephen
Want / need more information on the Leica 28mm Elmarit F2.8 ASPH… here is a link to a detailed review by Erwin Puts.
Buying Used Photographic Equipment
Buying used photographic gear can be a great way to save a few bucks and get that lens or camera body you’ve been dreaming of now. In this audioblog I outline a few suggestions to consider when buying used gear online or at a photographic store.
The artwork below was just made with my “used” Leica M7 and my “used” Leica 90mm Elmarit Lens.

Last Year’s Leaves, Vermont. 2009
From A New Eden
Leica M7 with 90mm Elmarit Lens
In Camera Overlapping Frame Panoramic Technique, 3X
Kodak Ektar Film
Printed 9.5″ x 25″ on Fabriano 640 gsm Rough, Hand Coated.
Copyright Stephen Schaub 2009

Print surface detail, hand-coated Fabriano.
The Corrupted M7 Meets Kodak Ektar
Ah yes I had a bit too much time on my hands Friday… I just figured out a method for slipping film in my Leica M7 using a similar technique I’ve outlined here for the XA and LCA camera systems… somewhere there is a German engineer grinding his teeth!

Early Spring, Vermont. 2009
Leica M7 with 50mm Summilux F 1.4 Lens
In Camera Overlapping Frame Panoramic Technique, 3X
Kodak Ektar Film
Printed 10″ x 25″ on Fabriano 640 gsm Rough, Hand Coated.
Copyright Stephen Schaub 2009
Publishing Your Own Photography Book- Part 2
I decided to have Blurb print and bind a second copy of A New Eden Volume 1 for two reasons…
- 1. To see how the printing consistency would be.
- 2. To see how the Image Wrap cover option compared to the dust jacket option.
Some More Thoughts:
THIS JUST IN- I like the Image Wrap cover with the premium paper as the best-of-all option- the dust jacket keeps falling off the book and drives me nuts. The dust jacket does have a better range of color than the image wrap, and is glossy but there is something nice to the look and feel of the image wrap, and on a small book with only 38 pages- like mine- as the extra material of the image wrap makes the spine look and feel nicer…the book just feels more complete. The premium paper is way nicer than the standard (I tried both) and really worth the few extra dollars. With regards to printing consistency… seems OK to me so far but I will continue to monitor and keep you posted if my thoughts change.
Biggest question: does this process make sense if you are selling your books? Services like Blurb are much less expensive than some other online publishing companies… that being said, the per book cost for my Eden project is now at almost $40. When I compare this to my similarly-priced second book Through A Glass Darkly -which is in a league all it’s own and beyond compare to anything Blurb or any online service can print or bind- it does give one pause. Once again, I think you need to think of a book like this as a very nice promotional piece, that you will at best maybe make a few bucks on… but ultimately with the ulterior motive of greater visibility for your works which will hopefully translate into print sales and other good things. I’d suggest a markup from Blurb’s cost at around 10%, it’s a fair percentage and at the same time keeps your per book cost at a point that is still marketable.
LINK: Publishing Your Own Photography Book, Part One.
Viva la Revolution – Stephen
Advanced Metering Techniques With The LOMO LCA and LCA Plus
In this very quick video I give two examples of creative solutions to enhance the metering capabilities of the LOMO LCA and the LOMO LCA Plus.
Part 2 – Is Cross Processing or XPRO Dead?
This is Part 2 to the post I made yesterday…more thoughts. A good sub-title for this would be: Process Does Matter!
Viva la Revolution- Stephen
