When Sharp is REALLY Sharp: High Resolution Films, Part 1

I’ve been testing a new film recently, Rollei Pan 25 (120mm) processed in Diafine (3+3) and the initial results are quite amazing! The film does have a bit of a nasty curl to it when dry but nothing a glass carrier or oil mounting for scanning won’t fix… Here is a sample image I made using this film (shot on a 1960 Rollei TLR “F” at f/11 at 1/8th, exposed at BOX speed 25!) as well as two detail crops…just click on the thumbs to get an enlargement.

Note: Z= Zone. Also, the usable dynamic of this film is huge…I have great shadow detail down into Zone II (easily) and the highlights are very clean with nothing blocking up and the grain is almost impossible to find!

The final full size image is 20.7″ x 20.7″ at 360dpi (optical scan resolution 3200, 16Bit). It is important to note that NO SHARPENING was applied in scanning or in post processing and NO NOISE REDUCTION has been applied either…the file is au naturale! I will continue to refine this film/ process over the next few days followed by testing of Efke 25 and then a final comparison between Rollei Pan25, Efke 25 and Kodak Technical Pan Film (I have quite a bit of frozen Tech Pan). All images and tests will be shot on 120mm film. Stay tuned!!

Viva la Revolution!!


What is YOUR Usable EI – Exposure Index?

First a quick bit of background info:

Exposure Index- “EI”- is your personal speed setting for a particular film and developer combo that in most cases is different than the manufacturers posted ISO or ASA data (lots of reasons for this difference) and it reflects a photographer’s specific film requirements with regards to shadow and highlight detail, contrast, grain, etc… Many photographers do extensive testing to determine the best EI for a particular film and developer combo but in the end most photographers settle for a single EI and developer time for a particular film. An example would be- “I shoot Kodak TX at an EI of 1250 and process in Diafine 3+3 at 70F.”

Now for the Diafine Twist:

That tested EI is not the “only perfect EI” but rather just one possible working EI when using Diafine Developer. For example, I have determined that TX processed in Diafine at 3+3 has a USABLE EI range of 400-1250/ 1600…that means that I can rate it at 400 or I can rate it at 1250 if I need to or I can rate it at any in between EI based on subject exposure requirements- there is enough latitude with regards to exposure and development with TX and Diafine that both of these EI are possible for scanning purposes and produce brillant negatives…even one shot right after another on the same roll at a different EI, each would get the same processing time in Diafine– it is like working with the very forgiving Ilford XP2 Super which can handle a range from EI 100-800 (C-41 film) but with real B&W film! (Note: I love XP2 Super but it is a very different looking beast than conventional B&W film.)  With a “normal” developer, say D-76, you would need to increase or decrease your development time or temp or both if you changed your EI beyond half a stop with most black and white films.

So here are a few films I use with their USABLE EI range based on my testing. (NOTE: all USABLE EI listed are for Diafine Processing as outlined here on Figital Revolution.)

  • TX: 400-1250/ 1600 (3+3 at 70F)
  • 125PX: 125-400 (3+3 at 70F)
  • Fuji Acros: 100-200 (4.5 + 4.5 at 70F)
  • TMY-2: 400-640 (3+3 at 70F)
  • FP4+: 100-225 (3+3 at 70F)

Final Thought…why would you want to have a different EI for the same film or know the EI range for a particular film? The answer is flexability (how much can I over or under expose and still get a good negative)- with this approach and knowledge let’s say, for example, I am working with a film like Kodak TX-just load a roll in the morning and start shooting and adjust your USABLE or “flexible” EI as the day and lighting change… when you’re done just process the whole roll with your normal Diafine processing time and scan away! The results are consistantly USABLE and amazing.

Discover X Films! Kodak 125PX in Diafine!

I just couldn’t help myself…I needed to test yet another film in Diafine! What I have discovered has made me very, very happy. If you have been following the progression of articles here on The Figital Revolution I have been posting on Diafine Developer and an array of different black and white films for scanning purposes it should by now be clear by now that I feel that this is a great combo when ease of process, sharpness and huge tonality are required. Yes, there are finer grain developers but this finer grain comes at a cost, namely film speed which is something Diafine has no problem with!

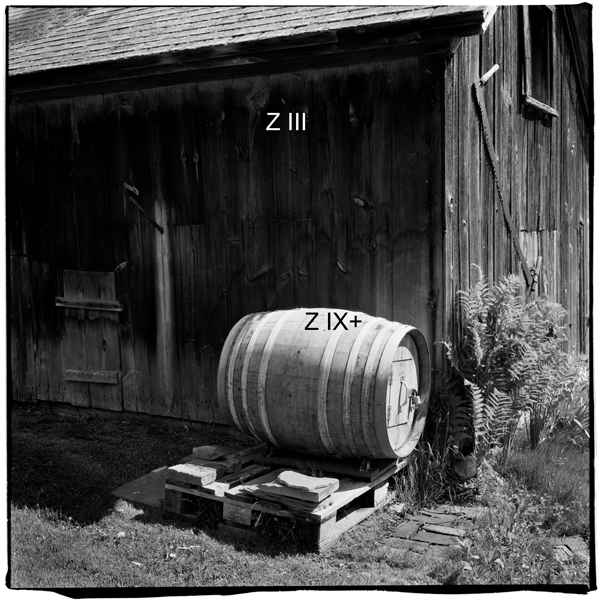
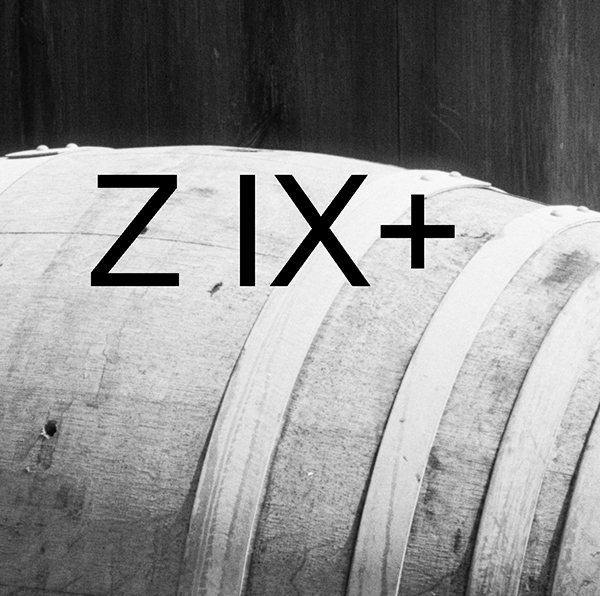
So here is what I have just found….Kodak 125PX in Diafine is a perfect match!!! I’ve never given 125PX much thought until I decided to try this test and the results have made me a convert. I love the look of the grain, it is REALLY sharp and has a beautiful tonal range with a working EI of 320-400. Marry 125PX with my other favorite “X” film TX (EI 1250-1600) and all bases for my needs are covered. Here are two sample pictures made recently on 125PX…the full size image is 16.5″ x 25″. (35mm negative, 6300 optical dpi wet mount scan.)

Please note that the second image was shot under very flat light and scanned at 3150 dpi.

Here is my processing Technique:

  • Diafine Developer at 72-75 F
  • Part A 3 minutes (two inversions every minute…gentle.)
  • Part B 3 minutes (two inversions every minute…gentle.)
  • Water Stop 1 minute Fill and Dump (72-75 F)
  • Fix Kodak Rapid (5 minutes)
  • Wash 1 minute running water (72-75 F)
  • Perma Wash 1 minute constant agitation
  • Wash 5 minutes (68-75 F)
  • LFN
  • Dry

The temperature for the Developer Part A and B is very important. I found that at 68-70 F my negs were a bit thin in the shadows and by increasing the temp just a few degrees (well within the usable range for Diafine of 70-85 F) everything fell right into place. I also now use this time and temp for TX as well – I often soup both films at the same time…very convenient! I no longer use a prewet for Diafine developer as over time it will dilute Part A to a point that could potentially cause problems.

So in conclusion… TX and 125PX are fantastic films and are now my personal films of choice for all of my black and white shooting. Every roll is run in Diafine as described above and the scans are easy and amazing! Give it a try you too may fall for the combo of “X” films and Diafine.

Final Note: I use in my workflow a bit of noise reduction on my images (Noise Ninja). These images are not at the default setting suggested by Noise Ninja but represent NN at about 1/4 strength.

Viva la Revolution!!

Fuji Acros 100 and Diafine Developer – Part 2

Finally part 2! Here are some sample images made on my M7 Leica and my Rollei 2.8 (F – 1960) using Fuji Acros at an EI of 160.

The two square images of course were shot with the Rollei (120mm) and the hand and zipper image was made with my Leica M7. Full size the Rollei images are 18″ x 18″ (142MB, 16 Bit, Grayscale, 120mm Negative, 3200 dpi scan) and the hand and zipper image is 16″x 24″ (160MB, 16 Bit, Grayscale, 35mm Negative, 6300 dpi scan). The detail crop of the zipper represents approx a 3″x4″ section of the larger 16″x24″ print…amazing!

Here is how I processed it…

Fuji Acros 100…EI 160

  • Diafine Developer at 68-72 F
  • Part A 4.5 minutes (two inversions every minute…gentle.)
  • Part B 4.5 minutes (two inversions every minute…gentle.)
  • Water Stop 1 minute Fill and Dump (68-72 F)
  • Fix Kodak Rapid (5 minutes)
  • Wash 1 minute running water (68-72 F)
  • Perma Wash 1 minute constant agitation
  • Wash 5 minutes (65-75 F)
  • LFN
  • Dry

For more information on the process and testing conducted please listen to the audioblog link below….

TIP– When your developer starts to get dirty…say after 30 plus rolls just run it through a coffee filter to “clean” it…use a different filter of course for each solution.

Fuji Acros 100 in Diafine Developer

Thumb

This is a test in progress post but I feel really good (and excited) about my results so far and wanted to share…

Here is a difficult test image (huge dynamic range) shot with 35mm Acros 100 (Diafine EI 200) with my Leica M7 and a 50mm F1.4 Sumilux at F8.

The processing is very different than suggested on the box or in previous posts- I will be posting the developing “how to” after this weekend as I want to run just one more test. The full size image which was scanned at Indian Hill Imageworks on our Imacon at 6300 dpi, fluid mount, 16 Bit is 24.5″ x 16.2″ (optical resolution). The crop image is a 2.5″ x 2.5″ section of this larger file…do you see the bent nail?! The large file link at the bottom will download a scaled down version (Approx 10″ x 6″ @ 360, 8 Bit) so say around 8MB uncompressed (best for high speed users only) will give you an idea of what is possible with the incredible combo…the full file (98MB) is amazing.

Crop

More in a few days.

Viva la Revolution.

Stephen Schaub

Large File LINK

Scanning, Color Mangement and Photoshop…The Diafine and TX Sage…Part 2

As promised here is the next installment in the ongoing exploration of Diafine Developer and TX. In these videos hybrid artist and master printer Stephen Schaub (The Leader) discusses scanning techniques, color management considerations and Photoshop techniques to maximize your Diafine processed TX negatives!! (Please note that due to a time limitation on Youtube the video has been broken into two parts so be sure to watch BOTH videos!!)

Video ONE

Video TWO

Stay tuned for part 3 of the Diafine and TX saga early next week on the Figital Revolution!

Resource Links

Noise Ninja

Pixel Genius (Photo Kit Sharpening Software)

Kami Scanning Supplies

Ergosoft High Fidelity Inkjet RIP Software

Eizo Monitors

Viva la Revolution!!