
 Click on the audio logo to listen to Part 2 on The Evolution of a Project.

Links:
The Evolution of a Project Part 1
Central Park NYC Images on www.stephenshaub.com
Click on the audio logo to listen to Part 2 on The Evolution of a Project.
Links:
The Evolution of a Project Part 1
Central Park NYC Images on www.stephenshaub.com
I think the pictures speak for themselves… wow!


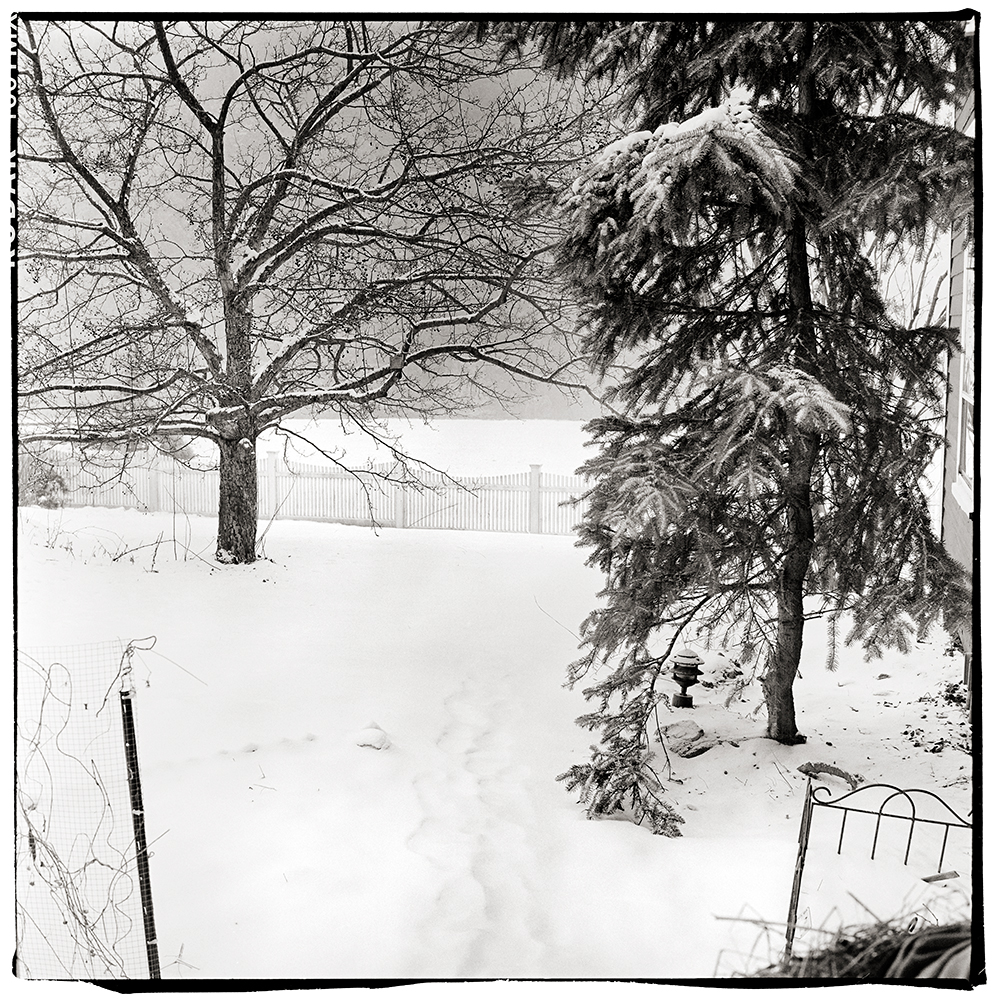


Few notes:
Both test images were shot on Kodak TMAX 100 at box speed.
The first test scene was very extreme… Zone 3 on the lower cabinets and the outside snow was Zone 14. The detail images are amazing and I really like how the grain is rendered.
In the second test scene I chose something that had a more “normal” range… deep shadows on the far right bush are Zone 3 and the lightest snow fell on a solid Zone 8… it was snowing during the test shots which is normal for Vermont this time of year, you can see the texture the falling snow makes in the background… the range is quite impressive and very easy to work with.
Both scans were straight scans (Imacon) with no sharpening and no noise reduction applied. In Photoshop my standard contrast adjustments were made with little to no effort. In both cases I had more than enough shadow information and a simple “S” curve did the trick… much like I would do with Diafine processed negatives.
When I compare these negative to the Fuji Acros negatives I find the Acros is a bit softer and the highlights tend to get very dense whereas the Kodak Tmax 100 negatives are a bit thinner looking but have full shadow detail and very controlled highlight density. The grain on the Tmax 100 in my opinion is a bit sharper than the Acros but both look really nice.
Both test images were shot on my 1960 Rollei TLR “F” (120). The first test image was at F5.6 at 1/4 sec and the second image was F11 at 1/30th.
How’s that for a great way to start the New Year!

Caffenol C Note:
I am working on a new book which will outline the technique I use for processing with Caffenol C and also give a starting direction for scanning and Photoshop adjustments to these negatives. I hope to finish sometime this winter so stay tuned.

Click on the audio blog logo to listen to this 14 minute review of the last 10 years of photography from my perspective as a hybrid artist and where the industry is possibly going in the next decade.
To everyone I wish a safe and happy New Years and stay tuned for a new post in a few days.

If coffee is good for me (and it is)…. it must be good for my film, right? I had heard about developing film in coffee back when I went to RIT but have never got around to trying it- until now.
My first test rolls were Kodak 400TX in both 35mm and in 120. The 35mm (above image) was shot in my Leica MP with a 28mm lens and the 120 was shot with the Cuboid using a F72 pinhole.
The method I used for mixing the developer can be found here on Digital Truth. My agitation was 1st minute constant and then 3 inversions per minute till end of time which for 400TX I chose 30 minutes at 70 F. After looking at my test negatives I think they are over-developed by quite a bit but my Imacon had no issue making a good scan. The increased development was a result I believe of the ascorbic acid added in the Caffenol C recipe. If I were to do 400TX again with this recipe I would go for around 20 minutes but I would need to run a test to confirm that time.
If you google Caffenol C or just Caffenol you will find a wide range of opinions regarding this processing technique. The grain is large and sharp and the film is VERY low contrast but that can be a good thing for scanning.
So why would you want to do this?
If you want to see a larger version of the picture above click here. Please note it is a large file.
Next test…. Ilford Fp4+ in Caffenol C using the time suggestion also found on Digital Truth. The 400TX I used for this test is a bit too fast for my current needs and from what I can gather from other users of Caffenol C Fp4+ is a good choice… stay tuned.
One last note… it smells like hell!
Viva la Revolution!
Link to article on RIT (Rochester Institute of Technology) web site:
A Use for that Last Cup of Coffee: Film and Paper Development
Here is a quick technique I use from time to time to get the maximum usable dynamic range out of film on a contrasty scene.
Please note: If you have never used PMK developer understand that it requires careful handling… always wear gloves and use safe chemical handling techniques as it can be quite toxic. Also with T Grain films the temperature is important so use a water bath to maintain 70 F during processing.
Exposure:
Expose the scene for the shadows… if you have a spot meter make sure you have a solid Zone III…. don’t worry about the highlights as they will be just fine. (Stay tuned for my review of the new spot meter by Metered Light!)
Once you have your exposure figured out overexpose by 3 stops. You could always just set your meter to an EI of 50 instead of the normal 400 for TMY-2 (this is what I do). In simplest terms we are overexposing by 3 stops and developing for 50% of our normal time. The developing procedure listed below represents a 50% reduction in development time from my normal with this film / developer combination. This technique will work for different films with PMK as long as you follow the simple rule…. overexpose by 3 stops and reduce your development time by 50%.
Processing:
1. Pre-wet- 1 minute at 70F, constant agitation (distilled H2O).
2. Developer: PMK for 7.5 minutes (1+2+100). Continuous agitation for the first 30 seconds then one inversion every 15 seconds till completed time. Save the used developer as you will use it again in the after bath.
3. Stop: Tap water, 2 minutes fill and dump with agitation. Do not use anything but water!
4. Fixer: TF-4 for 5 minutes, follow package directions. Only use TF-4 fixer!
5. After Bath: For those of you not use to using PMK you reuse the saved exhausted developer by dumping it into the tank for a second time after the fixer which will increase the image stain. 2 minutes with standard agitation. There are schools of thought that suggest that the after-bath is not important… with some films like 400TX I would agree but with this technique and film it is a good thing in my opinion.
6. Wash for 30 minutes.
7. Wetting Agent.
8. Dry.
Note: This technique as outlined here is for scanning purposes and I have not tested it for wet darkroom usage so I do not know how well it would work, BUT- for scanning it is fantastic. I would only use this technique for situations where the contrast / dynamic range is well beyond “normal”… this plus a bit of pre-exposure goes a long ways (no pre-exposure was used on this image but I will write an article on this technique very soon)! I have tested it on “normal” scenes with success, but it does require a bit more work in Photoshop to correct for the huge expressive shadows and somewhat flattened highlights, so it is best to use this for high contrast scenes.
So the results….drumroll please…

In the image above the shadows (Zone III) were placed on the dark barn board above the windows… the snow outside which was in direct sunlight was 17 stops brighter… this is a straight scan on our Imacon… no dodging or burning! There were no lights on inside the building so it was quite dark. In Photoshop I added a minor “S” curve but nothing else. The grain is very nice and controlled for 35mm. The snow outside the window has nice detail (not sure how well that reads in the online image)… nothing is lost on either end.
Camera: Leica MP with a 28mm lens.
Chemical resources:
I chose TMY-2 for this test as it is box speed in PMK and it is a film I really like… another good choice would be TMAX 100 which is also box speed but with the 3 stop overexposure you have a working film speed of 12… time to break out the tripod!
Viva la Revolution-
Stephen

Click on the Audio Blog logo to listen to a 4 minute introduction on Instant Photography (Polaroid and Fuji instant films) and the hybrid workflow. This post is an introduction to the upcoming multi part video series here on Figital Revolution so stay tuned.
Artwork Links mentioned in Audio….
Plus- stay tuned for my newest artworks made using instant materials to released later this fall. The show at Indian Hill Imageworks is tentatively scheduled to open on October 3, 2009… more information on that soon as well!
Viva la Revolution- Stephen
 This is part one in a multi-part article on stand development and semi-stand development (BW) for the purposes of scanning. I have been spending much time looking at different dilutions, different agitation techniques, different recipies and I have come up with a good working solution for my tested films that produces perfect results every time.
To listen to the audioblog portion of this post … just click on the Audio Logo.
Many of you know I really like Diafine Developer (I have written several articles here on its fantastic qualities for scanning)… the techniques I am about to outline have many of the advantages of Diafine but with finer grain and better highlight separation.
Before we get started, here is a shopping list if you want to try this technique for yourself:
Film: Fuji Acros or Kodak TMY-2 (New TMAX 400)
R09 “One Shot” Developer (Rodinal Replacement)
Kodak Xtol Developer
Ascorbic Acid
Borax
Or you can use 20 Mule Team Borax found at most Supermarkets.
Distilled Water (a few gallons)
Plus you will need, of course, your standard darkroom chems: stop bath, fixer, and hypo.
Stay tuned for Part 2 in two days!
Viva la Revolution- Stephen
Ethical Note: I do not endorse any vendor of photographic material over another. The links provided above are just an easy source to find the materials needed but by no means are the best or only source.
Many of you have been asking for some insight beyond the technical- more of “A Day in the Life” creative -type stuff, SO… here is a good example of how things can happen around here:
Ok, yesterday after posting the video on Focus and DOF here on Figital Revolution I was searching the web and came across a great new attachment which allows you to connect a Holga lens to a Canon or Nikon with precision… here is a link. It is made by S.K. Grimes who I have done some work with in the past and I am sure the construction is spot-on. I decided to call Adam at S.K. Grimes and ask about making a device like this for my Leica M. I love the Holga (my second book is all Holga work) and thought this could be a great side project. I also found online a home-made attachment / modification for the Holga lens on the Leica M, LINK, but I would prefer the precision of the S.K. Grimes version if I have a choice.
Then I got to thinking about my Through A Glass Darkly artworks and what I liked about them and remembered that last year I had done some work with Zone Plates on several different camera systems and that I had purchased a 28mm F32 Zone Plate for my Leica M7… so then, of course, I had to go find it. After digging through a few drawers in my studio it ultimately surfaced so now I only needed to find some fast film because at F32, 100 speed film would be out of the question for hand-held exposures (maybe). So, yes, I found a roll (one, lonely little roll!) of XP2 Super which I knew had enough exposure latitude to rate with an EI of 800 or even 1250 if needed (I settled on 800).
Finally I decided to shoot a test roll around my yard here in Vermont. I was really curious to see if I could fuse the look and feel of my Through A Glass Darkly Artworks, the Zone Plate, the Overlapping-Frame Panoramic Technique AND my most recent A New Eden Artworks into one creative stew. About 30 minutes later I was off to my favorite lab Phototec, in Rutland Vermont, to have the C41 film processed and-equally importantly although perhaps not so much creatively- get my Prius’s oil changed. One hour later my car was running fine and the negatives were dry.

I was surprised at how much I really liked them… really, really liked them! (This is not the way ALL my brilliant ideas go, you know.) So I had to hurry back to the studio, fire up the Imacon and run a test scan. After a bit of thought on how to compensate for the very low contrast negatives I came up with a good scanner setting and set to work on the file. An hour or so later the image was finished and I really liked how it looked on the screen. Buuuuuut as I had chosen to shoot B&W film and my current favorite art paper (hand-coated Fabriano, 640 gsm) only has an icc. for color and not the required K4 linearization for black and white printing on my d’Vinci Printer it was time- oh yes!- to make the linearization. So about an hour after THAT the linearization was complete and I was all set to print. I had several sheets of paper coated both rough and cold press (luckily left over from a client’s job from last week) but I ultimately decided to go with the cold press as the smoother surface texture would, perhaps, help define the soft elements of the image better than the rough would (I plan to run a test soon on this to be sure!)

Conclusion… I really liked the image and possible new direction for these artworks- hooray! Did I get my work for client’s done today? No! Is it ultimately worth it, in the end, to go with the “art attack” when it strikes? Always!! You can’t do it all the time, BUT inspiration is too valuable not to follow up whenever humanly possible. And if you can get your car ready for another couple of thousand miles of exploring at the same time… even better.
Next, I think I will try this in color using the Fuji 800Z. And as I always say… experimentation is key! Stay tuned.
Viva la Revolution- Stephen
How’s that for a catchy title? The image below represents- as I mentioned in my audio blog journal from Italy – a situation where I had to work though some difficult restrictions but in the end was rewarded with an image I really like. The artwork was made in the Vatican Museum which is really beautiful and amazing, but as you can imagine very strict with rules about what and how you can photograph. When we entered the “room of heads” (my name) I was really drawn to the layers of history and how everything seemed to merge into an ordered historic chaos. This was also a situation where the macro feature of the XA 4 really came in handy!

Caligula and Friends
Vatican Museum, 2009
Triple Overlapping Frame Panoramic Technique
Capture: Olympus XA 4, Kodak Ektar 100
Image Size: 9″ x 25″, Printed on Fabriano Rough 640 GSM
Copyright Stephen Schaub 2009
I’ve just started a film test in preparation for my trip to Italy next month– the two films in consideration are Kodak Ektar 100 and Agfa Precia CT cross processed. Thus far, most of the artworks from my current series A New Eden are either XPRO (cross processed- E6 film in C41 chem) or expired film. However- after much testing here on FR I have recently fallen in love with the new Kodak Ektar …SO I decided to do a quick comparison test and find out: does the XPRO effect really have to be actual cross-processed film?
So what do YOU think? Look at the snapshots below and see if you can pick out the one that is the Agfa Precia CT XPRO…only one is true XPRO…the others are all Kodak Ektar in Photoshop using Alien Skin Exposure 2!
Think you have the right answer? Then give a listen to the Audio portion of this post for additional thoughts on cross processing / Xpro… as well as the answer!


Please click on the logo to listen to the audio.
When you finish with part one, click here to listen to part 2!
