Testing New Canson Papers

Burning the midnight oil at Indian Hill Imageworks!!! Just how many patches are in the icc. test target?…over 2,200!!

Stay tuned for my thoughts/ review on my first tests: Rives BFK and Arches Platine!

Now back to printing!

Viva la Revolution!

Stephen

Visiting Canson

This audioblog is a quick list of observations I made on my recent visit to Canson Distribution Facilities here in the US. In the coming weeks I will be reviewing their new offerings, 17 papers and canvases in all! Give a listen and stay tuned!

Below find a sample of images I made at their US facility…its over 140,000 square feet!!

Link to Canson

First paper I am testing…Rives BFK!

New Kodak Ektar 100 Film – Part 1

I was lucky enough to get a brick plus (35mm) of the new Kodak Ektar film at Photo Expo Plus in NYC… so when I returned to my studio in Vermont I quickly loaded my Leica M7 with a roll and decided to make a few “test” shots around my yard.

Image Results:

The Full Size image is a 20″ x 30″ print- the crop represents a 4″ x 4″ section of the full size.

Testing Specs:

  • Leica M7 with Leica Summilux 50mm 1.4 Lens
  • F 5.6 at 1/125, Hand-held
  • Film was rated at Box Speed (more on this later…)
  • Scan was done on an Imacon with NO sharpening applied, scanned at 6300 dpi.
  • Photoshop work was limited to white point and black point, no color correction, no noise reduction, no sharpening, no curves…

Image Size/ File Size Info:

  • 309 MB file at 300 Optical DPI, 16 Bit
  • 20″ x 30″ Print Size

Initial Thoughts:

This new offering by Kodak has very tight grain (this is 35mm folks!!) with good, bold color but still “neutral/ natural” in feel. My initial feeling is that it is a bit slower than box speed (normal for most negative material). On my next test roll I will rate it around 50-64 which should be perfect (with color negative material its better to be safe than sorry with regards to your exposure!). Box Speed (ASA 100) is usable, but under difficult lighting situations underexposure is just too great a risk. So far… I am very impressed…stay tuned for Part 2 in a few days.

Viva la Revolution!

The Financial Crisis: How Could it Affect Photography?

Everyone knows that the current global financial crisis is crippling many businesses- but it is possible that the photographic industry as a whole may come out of this painful situation better than it went in! Give a listen.

Rollei Retro 100 Film Processed in Diafine Developer

Yet another Diafine Developer Test! I’ve been wanting to try this film for some time now and was able to fit a test into my schedule this week so here are the results and my thoughts.

First my Thoughts:

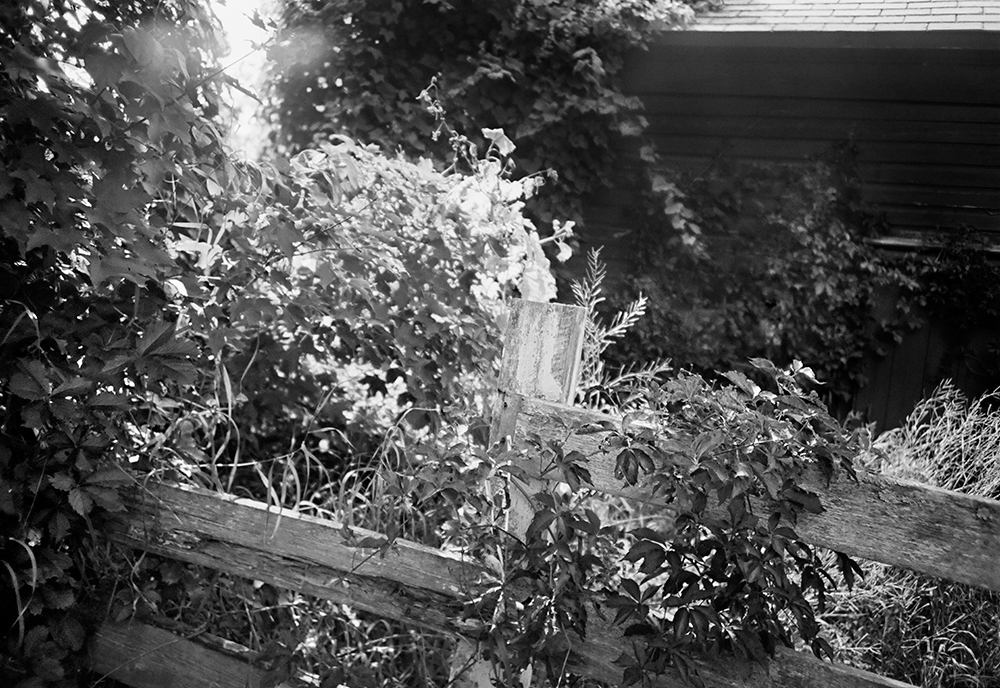
Rollei Retro 100 is a nice film with good classic grain structure and good tonality…photographers who like classic grain and film with a bit of punch will love it with Diafine. The film has a usable EI from around 50-200 (in Diafine) but I found that at 100 I got the best shadows and midtone separation and it gave me a bit of margin for meter error. The highlights are clean, bright and open even in the brightest areas.

For photographers who want that classic street photographer look this would be a good choice…however, if you were raised on Fuji Acros for breakfast and TMAX for dinner and love those films this probably won’t be your cup of tea.

The Results:

Both images were made using a Leica M7 with a 50mm Summilux Lens at F5.6 – in camera meter at an  EI of 100. Scans were done on an Imacon Scanner at 3150 dpi, no sharpening or noise reduction was applied to either file. File prep/ workflow in Photoshop CS3 is my standard for all Diafine developed test negatives which is to apply just a bit of an “S” curve and make sure my white and black points are fine.

The sharpness of the film is good but again not like TMAX 100 or the New TMAX 400. But I do like the film alot! It won’t be my first go to film for general shooting but it is something that has a unique look and has found a place in my film bag.

PDF with more Rollei Retro Information.

Processing Technique, Diafine Developer and Rollei Retro Film:

  • 4 Minutes Part A, 75F – 2 inversions every minute.
  • 4 Minutes Part B, 75F – 2 inversions every minute.
  • Wash 30 Seconds
  • Fix 5 Minutes
  • Wash 30 Seconds
  • Perma Wash 1 Minute
  • Wash 10 Minutes
  • LFN
  • Dry

Final note: There has been conversation (gossip) on the web that Rollei Retro 100 is AGFA APX 100 or something very similar…as I don’t have any AGFA APX 100 to test I can neither confirm nor deny this BUT even if it is just a slightly tweaked version of APX – as AFGA is no longer in business- it is nice to have a “similar” film still being made.

Viva la Revolution!!!

___________

UPDATE 9.13.2008:

Link to a conversation on Flickr where information on the maker of Rollei Retro (old AGFA) can be found as well as exciting information on the NEW film release set to replace this film as of Photokina 2008:

LINK TO ARTICLE/ DISCUSSION

Unplugging Your Paper

I spend a lot of time testing and re-testing my materials so that when I need to make a print I can make it perfect the first time. One of the biggest difficulties with printing on uncoated papers is the paper getting plugged up (this a huge problem with the introduction in many new printers of 9+ inks…that’s a whole lot of fluid!) The solution can be simple (note: its not Pepto Bismol) so give this audioblog a listen!

Below: Hariku Example and Link to Test Target!!

The Photographic Project

Ever wonder why or how to start a photographic project? Many photographers I know shoot and shoot with the idea that at some point they will edit and a project or maybe even a book will appear!…the tooth fairy may also appear but don’t bet on it. In this audioblog I outline my method for starting a new photographic project along with specific project examples. Give a listen!

Processing Color Film in Diafine Developer

I’ve read mixed reviews about this concept online so I decided I needed to try it myself. I chose Ilford XP2 Super and Kodak BW400CN, both in 35mm as test films. My results were mixed…the Ilford out-performed in my opinion the Kodak (with regards to tonal range as the Kodak was much harsher) but was anything gained over say TX or 125PX in Diafine?…you be the judge. I will say that the look of a print made using this technique is different and in some cases could be used in a very creative way. The test image was shot with a LOMO LCA+ with the Ilford XP2 Super rated at EI 200. Be sure to click on both images to see them at a larger size.

Tech Notes:

  • EI Range for full expressive negatives: 100 – 200
  • Diafine Developer at 80F!!!!
  • Part A for 5 Minutes with two inversions at the start of each minute.
  • Part B for 5 Minutes with two inversions at the start of each minute.
  • Wash for 2 Minutes
  • Fix: 5 Minutes or package suggestion.
  • Wash 5 Minutes
  • Perma Wash: 2 Minutes or package suggestion.
  • Final Wash, LFN and Dry!

I have also found that these negatives scan really nicely using most generic gray scanner profiles and the grain is there but acceptable for a process such as this. Give it a try!

Viva la Revolution!!!!

Final Note: The LOMO LCA+ is a Zone Focus camera and as such comparing the sharpness to say a Leica is a real mismatch…but the LOMO has an amazing quality all its own!

The Nightmare Print

Every photographer has his or her own “nightmare” print story- some more than one! In this audio blog I discuss how I (Stephen Schaub) work through a nightmare print at Indian Hill Imageworks- give a listen!

Hariku Paper, “Cloud Dragon Paper”, as mentioned in the audioblog as well as the “Nightmare” Print.