
In this very quick video I give two examples of creative solutions to enhance the metering capabilities of the LOMO LCA and the LOMO LCA Plus.
analog photography
Vignetting The LOMO LCA
A quick video on how to vignette the LOMO LCA and LCA+ using the mechanics of the camera to produce repeatable results!
Part 2 – Is Cross Processing or XPRO Dead?

This is Part 2 to the post I made yesterday…more thoughts. A good sub-title for this would be: Process Does Matter!
Viva la Revolution- Stephen
Is Cross Processing or XPRO Dead?
I’ve just started a film test in preparation for my trip to Italy next month– the two films in consideration are Kodak Ektar 100 and Agfa Precia CT cross processed. Thus far, most of the artworks from my current series A New Eden are either XPRO (cross processed- E6 film in C41 chem) or expired film. However- after much testing here on FR I have recently fallen in love with the new Kodak Ektar …SO I decided to do a quick comparison test and find out: does the XPRO effect really have to be actual cross-processed film?
So what do YOU think? Look at the snapshots below and see if you can pick out the one that is the Agfa Precia CT XPRO…only one is true XPRO…the others are all Kodak Ektar in Photoshop using Alien Skin Exposure 2!
Think you have the right answer? Then give a listen to the Audio portion of this post for additional thoughts on cross processing / Xpro… as well as the answer!


Please click on the logo to listen to the audio.
When you finish with part one, click here to listen to part 2!
Olympus XA vs LOMO LCA and LCA Plus
Please watch this video first for a discussion on the pros and cons of the Olympus XA vs the LOMO LCA and LCA+. Please note that the video is of high quality and may take a few seconds to load depending on your connection speed.
Comparison Images:


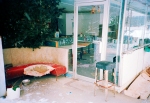
General Info: All test images were shot at F 2.8 on Kodak TX, processed in Diafine Developer, scanned on an Imacon with no sharpening applied, natural light. Please be sure to click on the images to see them larger.
LCA: Notice the general soft focus/ appearance…I shot this image 10 times and this was the sharpest. I changed my lens to subject distance and I changed my zone focus setting but in the end this was the best. It is not real sharp but does have a nice soft visual quality with some subtle vignetting.
XA: Very sharp at the point of focus (glasses)… and this sharpness is at F 2.8! The XA achieves its best sharpness around F 5.6 – F 8. The OOF (out of focus) quality is nice in the background and general illumination is pretty good edge to edge.
XA+: This is the same negative as the XA sample image above with the addition of a bit of a vignette and a bit of a general surface blur applied in Photoshop…I feel this hits the mark perfectly for my visual needs.
Useful Links:
A New Eden – Artworks by yours truly made on the LCA and XA (the new XA artworks can be found on the home page). This overlapping negative technique is possible with both the XA and the LCA and it the subject of a future post here on the Figital Revolution…stay tuned!
Notes: The Olympus XA came in other later versions such as the XA 1, XA 2, XA 3 and the XA 4 all of which are Zone Focus cameras. My favorite and the most collected and used is the original XA followed by the XA 4.
Final Thoughts: I will be posting additional articles regarding the XA with info on fill flash, long bulb exposures and additional tips and techniques in the coming weeks so again stay tuned!

Viva la Revolution- Stephen
UPDATE: I was wrong on the current price of the Lomo LCA+…it is not $199 US as I state in the video but rather $250 US…the XA is now a real bargain!
Diana Camera Film Loading Tip and Technique
Have you ever finished shooting a roll of 120mm film in a Diana F+ Camera only to find the roll very loose (light leaks, anyone?) …I’m all for some light leaks now and then- part of the fun with the Diana- but a loose roll that was NOT intentional can be a real problem! Here is a super quick video blog on how to load 120mm film in a Diana F+ camera and KEEP the film spool tight! This video demonstrates a modification to the film tabs that has proven very successful in over 100+ rolls of 120mm film pushed through my own Dianas!
Please note the video is high quality so it may take a few seconds to load.
Viva la Revolution- Stephen
New Kodak Ektar 100 Film – Part 1
 I was lucky enough to get a brick plus (35mm) of the new Kodak Ektar film at Photo Expo Plus in NYC… so when I returned to my studio in Vermont I quickly loaded my Leica M7 with a roll and decided to make a few “test” shots around my yard.
Image Results:


The Full Size image is a 20″ x 30″ print- the crop represents a 4″ x 4″ section of the full size.
Testing Specs:
- Leica M7 with Leica Summilux 50mm 1.4 Lens
- F 5.6 at 1/125, Hand-held
- Film was rated at Box Speed (more on this later…)
- Scan was done on an Imacon with NO sharpening applied, scanned at 6300 dpi.
- Photoshop work was limited to white point and black point, no color correction, no noise reduction, no sharpening, no curves…
Image Size/ File Size Info:
- 309 MB file at 300 Optical DPI, 16 Bit
- 20″ x 30″ Print Size
Initial Thoughts:
This new offering by Kodak has very tight grain (this is 35mm folks!!) with good, bold color but still “neutral/ natural” in feel. My initial feeling is that it is a bit slower than box speed (normal for most negative material). On my next test roll I will rate it around 50-64 which should be perfect (with color negative material its better to be safe than sorry with regards to your exposure!). Box Speed (ASA 100) is usable, but under difficult lighting situations underexposure is just too great a risk. So far… I am very impressed…stay tuned for Part 2 in a few days.
Viva la Revolution!
Photo Expo Plus 2008 Part 1
Yesterday was a VERY long day back and forth from Vermont to NYC for Photo Expo Plus… but it was well worth it. In the coming days I will be reviewing some of the products that intrigued and impressed me, as well as additional articles on those that DID NOT!
Upcoming articles will include:
 Canson Papers….Canson has just released many beautiful fine art paper (18 I think) for the purposes of Inkjet printing. Two that really look amazing are Rives BFK and Arches Platine- both coated for inkjet!!…I will be testing both of these and more in the coming weeks so stay tuned.
 Hahnemule Papers….Several new papers and upgrades are in the works for this paper maker (hush hush) so I will post articles and results in the coming weeks.
Kodak….I FINALLY got my hands on some of the new Kodak Ektar film and had a great conversation with Scott DiSabato (Marketing Manger Kodak Professional Films). Based on this conversation and sample prints which were available I feel that this film is definitely worth looking at! I will start my testing TODAY so again stay tuned!
I also had a chance to look at many new camera systems and lens options as well as other photographic accessories…it is going to be a busy month! Stay tuned!
It was also great meeting FR readers yesterday and having the opportunity to talk with and in some cases look at your works!
Viva la Revolution!
On a final note: when in NYC try dinner at Artisanal (www.artisanalbistro.com)…the Parmesan Gnocchi slow-cooked in Pork Belly and root Vegetables was, how you say… AMAZING!!!
The LOMO LCA – Part 1
 Over the next few months I’ll be writing several articles on the LOMO LCA and LCA+. I’ve decided to use these small and very opinionated cameras for my new artwork series, entitled Vanishing Vermont. Articles will focus on working with these cameras, how to carry them, films to use and why… XPros, where to buy and differences in current and older models.
I know there are a lot of opinions out there (both pro and con) about the LOMO (LOMOGRAPHY) and I look forward to an open discussion, so first lets agree on two things: 1. Its the print that counts! 2. See number 1.
Here are a few helpful links to get things started…check them out and stay tuned!
- http://shop.lomography.com/microsites/lca/
- http://shop.lomography.com/lca+/
- http://www.lomography.com/

Viva la Revolution!
- Me and My 1991 LCA!

