In this audioblog I present a philosophy of scanning film based on the understanding that in the end photographers make prints and our entire process from film capture to scan to Photoshop to printer is all based on making prints. I outline in detail techniques and settings which will apply to most scanners and will help you get the most of your film and scanner combination. This is a very long audioblog- 27 minutes- and as such have paper and pencil ready, as you won’t want to listen to my voice for this long twice!
Full Process Example Image
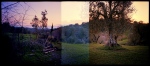
Yellow Spring, Vermont. 2009
This recent artwork of mine is a good example of the process outlined in the audioblog. I started with Kodak Ektar 100 film (35mm)- I’ve tested this film and understand how to get the most out of it in a variety of different lighting situations. The camera was my Leica M7 with a 28mm Zone Plate, and the image was made using my Overlapping Frame Panoramic Technique outlined here on FR. After processing (C41) the negative was scanned dry on my Imacon at 4000 optical dpi, 16 bit as an RGB positive, with miminal sharpening and dust removal. All other editing and contrast adjustments were done in Photoshop. My chosen Photoshop color working space as well as the scanning color space?sRGB. Final thought
Knowing the real limits of your workflow, technology and skill level and having a clear understanding/ feeling for your visualized final print helps make the entire process a very fluid and creative endeavour. Test first and remember: experimentation is key!
Click on Info, then click on Beta RGB: A New Working Space Proposal… the BETA RGB download if found on this page… spend some time on this site as it is a wealth of knowledge.
Part of my ongoing creative exploration of Zone Plate and Pinhole photography has entered a new area… high speed film. Most applications of Pinhole or Zone Plate photography require the use of a tripod or some sort of support device but that does not fit with my current shooting style SO I have just run tests of Ilford Delta 3200 and Kodak P3200 in a variety of different developers from an EI of 3200 – 25,000 to see if it would be possible to hand hold exposures under a variety of common lighting situations and get a negative that-when-scanned would have all of the expressive grey tonality I need with contrast in check… the answer is Yes! The best film for pinhole and zone plate high speed applications in my opinion would be the Kodak P3200 at 3200 – 6400. The sample images below are just a very quick test done at the end of the day in rainy overcast very flat light… the image on the left is a 28mm F32 zone plate on my Leica M7, the image on the right is a 28mm F151 Pinhole also on my Leica M7… both hand-held at shutter speeds over 1/30th even in this dismal low light… shot at an EI of 6400. The cropped image is a 5″ x 5″ example section of the pinhole image scaled to 20″ x 30″ … remember this is an EI of 6400 shot through a pinhole. I think the visual quality is amazing and I plan on shooting this afternoon and posting a fuller series of articles starting in a few days with the “secret” developer info as well as thoughts on working with pinhole and zone plate with high speed films on a variety of different cameras. Just a quick note- no noise reduction or sharpening has been applied to any image and all images are dry scans on my Imacon Scanner.
Left Zone Plate, Right Pinhole5" x 5" Crop of a 20" x 30" Print.
The sun has just come out (lots of rain here in VT this time of year) so I am off to shoot!
Viva la Revolution- Stephen UPDATE: Ok so most of the day has passed and I have managed to shoot two rolls of the Kodak P3200 at and EI of 6400 (the sun was out for exactly 2 hours!) and just finished processing them… they look fantastic! My exposures were for the most part using the pinhole (f 151) at shutter speeds ranging from 1/60 to 1/15 on my M7. I will post images sometime tomorrow…
I’ve completed my inital testing of Fuji 800Z with the 28mm Zone Plate on my M7… I like the results but I can tell you that getting a good negative/ scan that has decent contrast and PS techniques to keep shadow and highlight detail and enhance local contrast ain’t no small thing! I wish I could find some faster color negative material that that still had good color but it seems that Pro 800 and 800Z are my best bets for now. One thing I really love about the BW images is how the very nature of a black and white image abstracts in a way the color does not and I think this works very well with these images. Thoughts?
Today I did finish my client work first and still had time to scan and complete 2 more images from my roll from yesterday…
In The Willow, Vermont. 2009Dark Sky, Spring, Vermont. 2009
Viva la Revolution- Stephen
Tech Stuff:
Both images were shot with a Leica M7 with a 28mm F32 Zone Plate on Ilford XP2 Super at an EI of 800- in camera overlapping frame panoramic technique, 3X.
Scanned on an Imacon Scanner
Printed on the d’Vinci Printer as a d’Vinci Noir Print.
Many of you have been asking for some insight beyond the technical- more of “A Day in the Life” creative -type stuff, SO… here is a good example of how things can happen around here:
Ok, yesterday after posting the video on Focus and DOF here on Figital Revolution I was searching the web and came across a great new attachment which allows youto connect a Holga lens to a Canon or Nikon with precision… here is a link. It is made by S.K. Grimes who I have done some work with in the past and I am sure the construction is spot-on. I decided to call Adam at S.K. Grimes and ask about making a device like this for my Leica M. I love the Holga (my second book is all Holga work) and thought this could be a great side project. I also found online a home-made attachment / modification for the Holga lens on the Leica M, LINK, but I would prefer the precision of the S.K. Grimes version if I have a choice.
Then I got to thinking about my Through A Glass Darklyartworks and what I liked about them and remembered that last year I had done some work with Zone Plates on several different camera systems and that I had purchased a 28mm F32 Zone Plate for my Leica M7… so then, of course, I had to go find it. After digging through a few drawers in my studio it ultimately surfaced so now I only needed to find some fast film because at F32, 100 speed film would be out of the question for hand-held exposures (maybe). So, yes, I found a roll (one, lonely little roll!) of XP2 Super which I knew had enough exposure latitude to rate with an EI of 800 or even 1250 if needed (I settled on 800).
Finally I decided to shoot a test roll around my yard here in Vermont. I was really curious to see if I could fuse the look and feel of my Through A Glass Darkly Artworks, the Zone Plate, the Overlapping-Frame Panoramic Technique AND my most recent A New Eden Artworks into one creative stew. About 30 minutes later I was off to my favorite lab Phototec, in Rutland Vermont, to have the C41 film processed and-equally importantly although perhaps not so much creatively- get my Prius’s oil changed. One hour later my car was running fine and the negatives were dry.
Zone Plate Overlapping Frame Panoramic Technique
I was surprised at how much I really liked them… really, really liked them! (This is not the way ALL my brilliant ideas go, you know.) So I had to hurry back to the studio, fire up the Imacon and run a test scan. After a bit of thought on how to compensate for the very low contrast negatives I came up with a good scanner setting and set to work on the file. An hour or so later the image was finished and I really liked how it looked on the screen. Buuuuuut as I had chosen to shoot B&W film and my current favorite art paper (hand-coated Fabriano, 640 gsm) only has an icc. for color and not the required K4 linearization for black and white printing on my d’Vinci Printer it was time- oh yes!- to make the linearization. So about an hour after THAT the linearization was complete and I was all set to print. I had several sheets of paper coated both rough and cold press (luckily left over from a client’s job from last week) but I ultimately decided to go with the cold press as the smoother surface texture would, perhaps, help define the soft elements of the image better than the rough would (I plan to run a test soon on this to be sure!)
Surface Detail of Final Print on Fabriano Cold Press HC
Conclusion… I really liked the image and possible new direction for these artworks- hooray! Did I get my work for client’s done today? No! Is it ultimately worth it, in the end, to go with the “art attack” when it strikes? Always!! You can’t do it all the time, BUT inspiration is too valuable not to follow up whenever humanly possible. And if you can get your car ready for another couple of thousand miles of exploring at the same time… even better.
Next, I think I will try this in color using the Fuji 800Z. And as I always say… experimentation is key! Stay tuned.
Just a quick post… I’ve been looking for an “affordable” Leica 28mm lens and was able to make the move last week as Leica has a $300 dollar rebate now available! I decided on the 28mm Elmarit F 2.8 ASPH for a few reasons:
1. It is really small and light and only blocks a very little bit of the lower right corner of the viewfinder on my M7 when the hood is attached- none when it is not.
2. According to test reports* it’s damn sharp (I agree)… see print below / link. Additionally it has very little distortion and a very nice OOF (out of focus) rendering.
3. I had owned the Voigtlander 28mm F 1.9 Ultron lens a few years back and was not really that impressed (so I sold it) and the Leica 28mm F2 ASPH Summicron was out of the question due to the cost and it is a larger lens which blocks more of the viewfinder.
So how good is this lens….
Print 1: Full size print 9.5″ x 25″. Printed on Hand-coated Fabriano Artistico 640 gsm.
Print 2: Crop 4.5″ x 4.5″ of Full Size 9.5″ x 25″ Print
Print 3: Crop 4.5″ x 4.5″ of Extreme Full Size 19″ x 50″ Print!
Note: The negative was scanned on an Imacon Scanner (wet mount) at 4725 optical dpi, 16 Bit… about a 500MB file. Film… Kodak Ektar 100.
Viva la Revolution-
Stephen
Want / need more information on the Leica 28mm Elmarit F2.8 ASPH… here is a link to a detailed review by Erwin Puts.
As promised here is a quick review of the new Kodak Ektar film in 120!
Click on image to see crop detail… full size image is 40″ x 40″, crop detail is a 4.5″ x 4.5″ section outlined in the above image as a white box.
Technical Stuff…
Camera: Rollei TLR “F”
Exposure: 1/60 at F11
Film: Kodak Ektar 120, EI 64 (Same as my test for the 35mm version.)
Scanned on an Imacon Scanner, dry. I did my scan using a color setup I had created for the 35mm version of this film (scanner setting all balanced to a Macbeth Color Chart in direct sun) and found that it matched perfectly when opened in Photoshop.
Color Chart Example.
Photoshop adjustments limited to levels.
Full Size File: 600MB at 360 DPI which equals a 40″ x 40″ Print.
Cropped area equals a 4.5″ x 4.5″ section of the full 40″ x 40″ Print.
Conclusion… as with the 35mm version of this new film from Kodak it is hard to find something not to like… it scans quite easily, has great contrast and color, very fine grain with good sharpness. Again, I feel that it performs better in contrasty light at and EI of 64 than the box speed of 100 but that is just my opinion. Link to First Ektar Article here on FR.
ONE QUESTION… did you see the bent nail in the detail crop?… WOW!
Ah yes I had a bit too much time on my hands Friday… I just figured out a method for slipping film in my Leica M7 using a similar technique I’ve outlined here for the XA and LCA camera systems… somewhere there is a German engineer grinding his teeth!
Early Spring, Vermont. 2009
Leica M7 with 50mm Summilux F 1.4 Lens
In Camera Overlapping Frame Panoramic Technique, 3X
Kodak Ektar Film
Printed 10″ x 25″ on Fabriano 640 gsm Rough, Hand Coated.
Copyright Stephen Schaub 2009
Let’s be clear: I personally don’t like Redscale film and the image below confirms it. It is possibly going to give me nightmares or at least a rash… my wife describes it as the Amityville Horror photograph. Nonetheless, the audio portion of this post describes Redscale film technique and gives pointers on how to maximize your negatives and additional information on how Redscale film techniques works. If this is your cup of tea, then go for it!
LOMO REDSCALE Film Test: March 21, 2009
Camera: Rollei 35 S
Overlapping Frame Technique (3 Frames)
Exposure: F4 @ 1/60, Rated at Box Speed
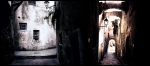
Below find new artworks from my recent photographic trip to Italy. All of the images below were shot on an XA 4 using Kodak Ektar film. I am still scanning and editing my film and anticipate finishing this body of work in a month or two, at which time I will post a complete portfolio. No titles yet; just basic information with each image for identification purposes. The last image in the series however is a photograph of a finished printed artwork from this series and as such has additional information.
To view additional artworks made using this technique please view my A New Eden Artworks.
One last image made since my return and after figuring out how to do this technique on the Rollei 35… experimentation is key!
Sets of Trees, Bennington, Vermont. 2009
Copyright Stephen Schaub. 2009


 Color Chart Example.